AllTheseKids
Bearded Dragon Egg
- Messages
- 27
- Location
- NC
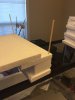
Alright, so I'll be getting a new baby beardie in a week and a half or so, he's had to have part of his tail and two toes amputated. While he's small, he will be housed in a 29 gallon tank I had lying around. I'm making his basking spot using the styrofoam and sanded grout method.
Materials:
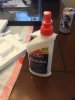
Elmers Glue All
Styrofoam sheets- got these from work from shipping boxes
Mapei sanded grout in mocha, two one lb containers
Cheap one time use brush
Chopsticks
Gardening shears to cut the chopsticks
Serrated bread knife to cut the styrofoam
Plastic drop cloth
Beer - husband drank PBR and I drank Shipyard Smashed Pumpkin - 9% ABV yikes!
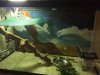
First we drew up a little sketch of what we wanted it to look like. Then we assembled the basking spot, and glued it together, using chopsticks to help as the glue took forever to dry. In retrospect, it would be a lot better to build it from the ground up.
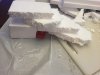
We then made the "stairs" by breaking the foam into smallish squares and rounding off the edges to look more like rock. We glued as we went, and it didn't stay together all that well, and we reinforced with chopsticks.
When it was relatively dry and kinda stayed together, we carried it out to the garage and used a plastic drop cloth to protect the floor and the bin I used as a table.
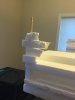
We mixed the grout and water per the instructions, and painted it on, trying to fill in all the cracks and crevices. I'm going to pick up a third container of grout today and flip the whole thing upside down and get to the hidden bits and underside of the thing.
The weight of the grout dislodged some of the stairs, so we stuck it together the best we could. Waited for it to dry overnight, and the stairs are still not stuck together, so when we do our next and hopefully last layer of grout, we will reinforce it again.
I'll take some more pictures today.
Materials:
Elmers Glue All
Styrofoam sheets- got these from work from shipping boxes
Mapei sanded grout in mocha, two one lb containers
Cheap one time use brush
Chopsticks
Gardening shears to cut the chopsticks
Serrated bread knife to cut the styrofoam
Plastic drop cloth
Beer - husband drank PBR and I drank Shipyard Smashed Pumpkin - 9% ABV yikes!
First we drew up a little sketch of what we wanted it to look like. Then we assembled the basking spot, and glued it together, using chopsticks to help as the glue took forever to dry. In retrospect, it would be a lot better to build it from the ground up.
We then made the "stairs" by breaking the foam into smallish squares and rounding off the edges to look more like rock. We glued as we went, and it didn't stay together all that well, and we reinforced with chopsticks.
When it was relatively dry and kinda stayed together, we carried it out to the garage and used a plastic drop cloth to protect the floor and the bin I used as a table.
We mixed the grout and water per the instructions, and painted it on, trying to fill in all the cracks and crevices. I'm going to pick up a third container of grout today and flip the whole thing upside down and get to the hidden bits and underside of the thing.
The weight of the grout dislodged some of the stairs, so we stuck it together the best we could. Waited for it to dry overnight, and the stairs are still not stuck together, so when we do our next and hopefully last layer of grout, we will reinforce it again.
I'll take some more pictures today.


")